
14-10-12, 08:02 PM
ال Templates :
تستخدم ايضاً لتغيير خصائص الأدوات ، ولكن الفارق بينها وبين styles انها تستطيع ان تلغي بالكامل الطبيعة الاساسية للأداة ، مثلاً هذه ال Templates :
والآن يمكنك تحديدها لزر أمر مثلاً :
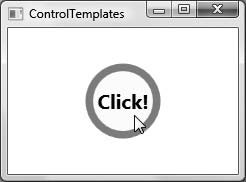
والناتج :
حلقتنا القادمة ستكون مقدمة عن WPF 3D ...
والله الموفق ...
والسلام عليكم ورحمة الله وبركاته .
تستخدم ايضاً لتغيير خصائص الأدوات ، ولكن الفارق بينها وبين styles انها تستطيع ان تلغي بالكامل الطبيعة الاساسية للأداة ، مثلاً هذه ال Templates :
كود :
[color=#000080]<Grid.Resources>[/color]

[i][color=#000080]<!-- A simple template for a round button for items in this grid -->[/color][/i]

[color=#000080]<ControlTemplate x:Key ="roundButtonTemplate" TargetType ="{x:Type Button}">[/color]

[color=#000080]<Grid>[/color]

[color=#000080]<Ellipse Name ="OuterRing" Width ="75" Height ="75" Fill ="DarkGreen"/>[/color]

[color=#000080]<Ellipse Name ="InnerRing" Width ="60" Height ="60" Fill ="MintCream"/>[/color]

[color=#000080]<ContentPresenter HorizontalAlignment=[COLOR=#0000ff]"Center"[/color]

VerticalAlignment="Center"/>[/COLOR]

[color=#000080]</Grid>[/color]

[color=#000080]</ControlTemplate>[/color]

[color=#000080]</Grid.Resources>[/color]
والآن يمكنك تحديدها لزر أمر مثلاً :
كود :
[COLOR=#000080]<Button Name ="myButton" Foreground ="Black" FontSize ="20" FontWeight ="Bold"

Template ="{StaticResource roundButtonTemplate}"

Click ="myButton_Click">[/COLOR] Click!

[color=#000080]</Button>[/color]
والناتج :
حلقتنا القادمة ستكون مقدمة عن WPF 3D ...
والله الموفق ...
والسلام عليكم ورحمة الله وبركاته .